Do you keep ignoring obvious problems with your toilet? Are you afraid that if you start something you may not be able to finish it? Below are the most common problems that people encounter with their toilets, and the ones that you should be able to solve yourself. And, if you simply don’t have the time or tools to handle these problems, or find yourself confronted with something more problematic, we are here to help.
Starting at the floor we’ll examine some common toilet issues and their fixes.
Base
Caulk around the base of the toilet is important to help keep the bathroom smelling clean. Water from the tub, mop water, or potty accidents can sneak under an uncaulked toilet and create some unpleasant smells.
A wobbly toilet can damage the wax seal, leading to leaks and a larger headache. If there is still caulk around the base you’ll want to remove it, make sure the bolts are tightened (but not too tight or you’ll crack the porcelain), then cut plastic shims to fit underneath and level the toilet, and then recaulk.
Seat
The most common issue with the toilet seat is that it becomes loose. Your first, and hopefully easiest, step would be to simply tighten the screws holding the seat. Of course once again, don’t over-tighten.
If that doesn’t work then you can add rubber bushings to help. You can also find a toilet seat tightening kit on Amazon that includes everything you’ll need. If the seat still has some wiggle to it you can add a seat stabilizer, but that does involve screwing it into the seat so you may only want to go that far if it’s necessary. If the toilet seat is cracked/broken and you’re planning to replace it then your first step will be to make sure that you measure correctly. Chances are you have a standard seat, but you don’t want to come home with something that won’t fit so it’s best to take a few quick measurements to save yourself a return trip.
- Measure between the bolts that attach the seat (from the center of each bolt)
- Measure the toilet length (from between the bolts to the outside edge of the front)
- Measure the width (from the outer edges of the widest point)
Before you can put the new seat on you have to take the old seat off and that can be easier said than done. Hopefully, your seat is held on by plastic bolts/nuts because those can’t corrode and should come off easily. If you have plastic, or your bolts aren’t corroded then you just need to pry open the cover over the bolt, use pliers to hold the nut underneath and use a screwdriver socket wrench, or another pair of pliers to loosen the bolt.
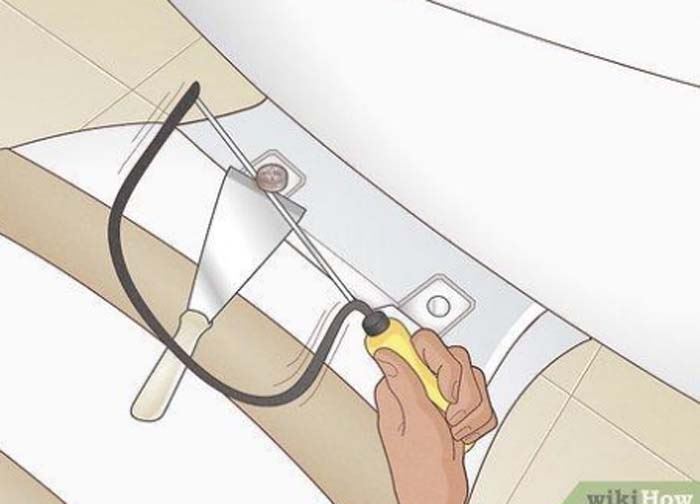
If the bolts are corroded then you may need to apply some lubricant, such as WD-40 to loosen them so they can be removed normally. If that doesn’t work then you may have to resort to breaking the bolt. There are 2 ways this can be done one is with a hacksaw, the other with a drill. In both cases, you’ll want to protect the toilet with duct tape, cardboard, or towels so you don’t slip and crack the porcelain. With the hacksaw approach, you want to fit the blade under the head of the bolt between the seat and the toilet.

With the drill approach, you’ll want to start with a 1/16th inch bit and drill a hole in the bolt where it meets the nut and drill about 1⁄4 into the bolt. Gradually increase the diameter of the hole with larger bits. Your goal is to weaken the bolt so that you can break it as you turn the nut.
Tank
Most of the pieces within the take can be easily replaced with a trip to the local hardware store. To replace the handle simply unchain the arm from the flapper, remove the nut on the backside, and pull it out through the hole in the front. Do those steps in reverse to install the new handle. If the toilet keeps running then first you’ll want to make sure the flapper is sealing. Most flappers are made of rubber that can break down over time, especially if you use bleach products in the tank. To replace the flapper you’ll want an empty tank, so first turn off the water and then flush the toilet to get rid of all the water. You may want to take the old flapper with you to make sure you buy the correct replacement.
Another reason the toilet may run is because water is rising above the overflow pipe. There are different styles of tank floats but they all should have an adjustment screw so that you can adjust when the tank stops filling, preferably about half an inch from the top of the pipe. If you have the arm and ball type float then you can also screw or unscrew the ball from the arm to stop the water.
And, if you find yourself in the following situation then please don’t hesitate to call (910) 390-1742.
Suds coming from the toilet turn woman's bathroom into a bathtub

